Big-Data-Processing (FullStack & beyond) Part-1
Web-App to capture/generate data
In this post, let’s go over the creation of web application to capture user behavior. Docker and compose are required if you want to simulate the work.
Our app will soon take shape as showed below. So, let’s get started.
Web-Client
FROM ubuntu:21.04

# NodeJs v14x or v16x doesn't support Ubuntu v22.04 yet.

RUN set -ex \

    && apt-get update -y \
    && apt-get install -y curl dialog net-tools \
    && curl -sL https://deb.nodesource.com/setup_16.x | bash - \
    && apt-get update -y \
    && apt-get install -y nodejs \
    && npm install --global @angular/cli@latest
# A foreground process to keep the container alive

CMD ["tail -f /dev/null"]
Save this into a file named angular.Dockerfile and run,
docker build -t my-angular -f angular.Dockerfile .
docker run --name angular --rm -it -p 4200:4200 -v $PWD:/usr/local/bin/imdb-app my-angular bash
We have mounted the current directory as /usr/local/bin/imdb-app in our docker container so as to persist our work.
Let’s generate our app scaffolding with,
cd /usr/local/bin/imdb-app
ng new angular --routing=true --style=scss
Now, run the application using,
cd /usr/local/bin/imdb-app/angular
echo '<h1>Hello, World!</h1>' >src/app/app.component.html
ng serve --watch --port 4200 --host 0.0.0.0
In your web browser, visiting http://localhost:4200 should show a Hello, World! message.
We will be editing the files in <your current directory/imdb-app/angular below. You should see this webpage refresh automagically as you make edits to these files.
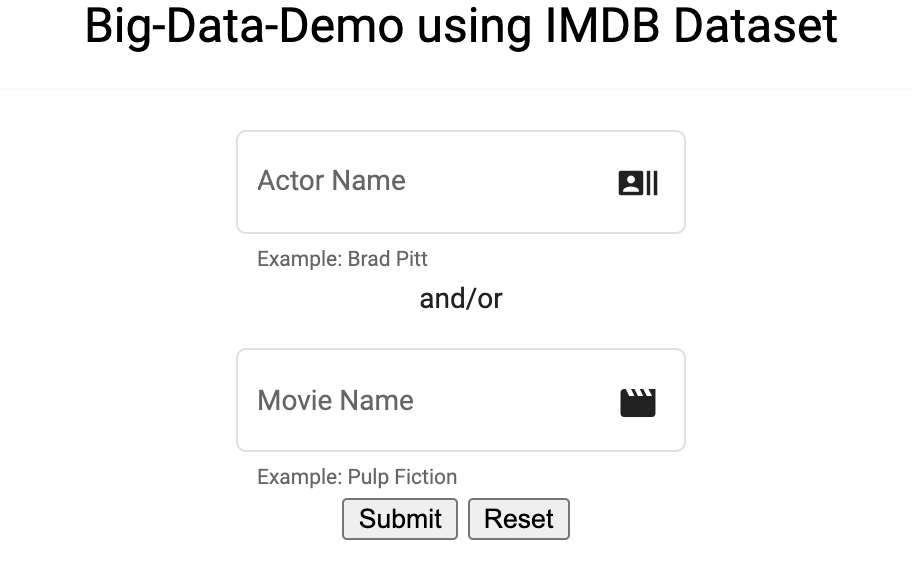
Let’s get to work to add a form so that user can enter movie and/or actor on the webpage. We’ll edit the app.component.(html/ts) files. Once we are done, the page will look as showed below.
We are going to use Angular Material to style our webpage, so let’s go ahead and install it first. Inside the docker container run,
ng add @angular/materialAdd the following Material modules to src/app/app.module.ts file.
// ...

import {FormsModule, ReactiveFormsModule} from '@angular/forms';
import {MatFormFieldModule} from '@angular/material/form-field';
import {MatInputModule} from '@angular/material/input';
import {MatIconModule} from '@angular/material/icon';
import {MatCardModule} from '@angular/material/card';
import {MatProgressSpinnerModule} from '@angular/material/progress-spinner';
import {MatTableModule} from '@angular/material/table';
// ...

imports: [
    BrowserModule,
    //....

    BrowserAnimationsModule,
    FormsModule,
    ReactiveFormsModule,
    MatFormFieldModule,
    MatInputModule,
    MatIconModule,
    MatCardModule,
    MatProgressSpinnerModule,
    MatTableModule
  ],
//...
Add the following code to app.component.ts and app.component.html files, respectively.
// src/app/app.component.ts

import { Component, OnInit } from '@angular/core';

@Component({
  selector: 'app-root',
  templateUrl: './app.component.html',
  styleUrls: ['./app.component.scss']
})
export class AppComponent implements OnInit {

  public msg: string = "Big-Data-Demo using IMDB Dataset";
  public actor: string = "";
  public movie: string = "";

  constructor() { }

  ngOnInit(): void { }

  public formSubmit(form: any) {
    /* To Do */
    // Post <form values> to the IMDB server endpoint

  }
}
// src/app/app.component.html
<h1 style="text-align: center;">{{msg}}</h1>
<form #form = "ngForm" (ngSubmit) = "formSubmit(form.value)" >
<mat-card style="text-align: center;">
<mat-card-content>
<mat-form-field appearance="outline">
<mat-label>Actor Name</mat-label>
<input matInput type="text" name = "actor" placeholder="Actor Name ..." ngModel>
<mat-icon matSuffix>recent_actors</mat-icon>
<mat-hint>Example: Brad Pitt</mat-hint>
</mat-form-field><br/>
<p>and/or</p>
<mat-form-field appearance="outline">
<mat-label>Movie Name</mat-label>
<input matInput type="text" name = "movie" placeholder="Movie Name ..." ngModel>
<mat-icon matSuffix>movie</mat-icon>
<mat-hint>Example: Pulp Fiction</mat-hint>
</mat-form-field><br/>
<button mat-raised-button color="primary" style="margin-right:5px;">Submit</button>
<button type="reset" mat-raised-button color="primary" style="margin-right:5px;">Reset</button>
</mat-card-content>
</mat-card>
</form>Disclaimer: You should be using Form Controls, Form Groups and Form Validations for a production app. We are only covering the bare essentials to get the big picture going.
Okay, so with that we’ve got our UI all set so as to gather input parameters required to fetch the actor/movie information from IMDB dataset we have downloaded as explained in this post.
Now, it’s time to bring our server side application to life and serve IMDB actor/movie information based on user input.
Web-Server
FROM python:3.9.10-slim-buster

RUN set -ex \

    && apt-get update -y \
    && pip install graphene flask flask-cors \
    && pip install flask-graphql pandas
# a foreground process to keep the container alive

CMD ["tail -f /dev/null"]
Save this into a file named flask.Dockerfile and run,
docker build -t my-flask -f flask.Dockerfile .
docker run --name flask --rm -it -p 8080:8080 -v $PWD:/usr/local/bin/imdb-app my-flask bash
mkdir /usr/local/bin/imdb-app/flask && cd $_
cat <<EOF 1>server.py
#!/usr/bin/env python

from flask import Flask, request
from flask_cors import CORS
import json

app = Flask(__name__)

cors = CORS(app, resources = {
  r"/*": {
    "origins": [
      "http://localhost:4200"
    ]}
  })

app.debug = True

@app.route("/")
def hello_world():
  return '<h1>Hello, World!</h1>', 200

if __name__ == "__main__":
  app.run(debug=True, host="0.0.0.0", port="8080")
EOF
# Run flask server
python server.py
Pointing your web browser to http://localhost:8080/, you should see Hello, World! message.
It’s time to grab the imdb_process.py and place it in imdb-app/flask/modules/ folder. We will use this module in the API end point we are going to add to our server.py below.
Also, move actors.tsv and movies.tsv imdb datasets to imdb-app/flask/assets/imdb_data/ folder.
#server.py
#...
from modules import imdb_process
import pandas as pd
#------- LOAD THE DATASET INTO MEMORY ------------#
info = imdb_process.get_datasets()
#...

@app.route("/FetchInfo", methods = ['POST'])
def fetch_info():
  actor = request.form.get('actor', None)
  movie = request.form.get('movie', None)
  results = pd.DataFrame()
  if actor:
    results = info['actor'][info['actor'].primaryName.isin(actor.split(','))]
    results = imdb_process.fetch_info(info['actor'][info['actor'].primaryName.isin(actor.split(','))], info['movie'])
  if movie:
    results = results.append(imdb_process.fetch_info(info['actor'], info['movie'][info['movie'].primaryTitle.isin(movie.split(','))]))
  results = results[imdb_process.get_cols_original()]
  results.columns = imdb_process.get_cols_modified()
  results = json.loads(results.drop_duplicates().to_json(orient="values"))
  return json.dumps({
    "error": None,
    "msg": None,
    "data": results,
    "header": imdb_process.get_cols_modified()
  }), 200

#...
Now, our web-server is ready to serve the movies’ information of the actors requested.
Web-Client
Let’s test this new feature using our web-client application. But first, we need to add some code to UI.
Import HttpClientModule in our app.module.ts file.
//...

import { HttpClientModule } from  '@angular/common/http';
//...

imports: [
    BrowserModule,
    HttpClientModule,
    //...
Create movie.service.ts file in src/app/services/ folder and add the code below.
import { Injectable } from '@angular/core';
import { HttpClient } from  '@angular/common/http';
import { Observable } from  'rxjs';
import {map} from 'rxjs/operators';

@Injectable({
  providedIn: 'root'
})
export class MovieService {

  private url = "http://localhost:8080/";

  constructor(private http: HttpClient) { }

  getHello(): Observable<any> {
    return this.http.get(this.url).pipe(map(res => res));
  }

  getInfo(form: any): Observable<any> {
    let params = new FormData();
    params.append('actor', form["actor"]);
    params.append('movie', form["movie"]);
    return this.http.post(this.url + 'FetchInfo', params).pipe(map(res => res));
  }
}
Now, let’s make use of movie.service.ts in app.component.ts.
//...

import { MovieService } from './services/movie.service';
//...

  public header: string[] = [];
  public data: string[] = [];
  public loading: boolean = false;

  constructor(private movieService: MovieService) { }
  //...

  public formSubmit(form: any) {
    this.loading = true;
    this.movieService.getInfo(form).subscribe(res => {
      this.header = res.header;
      this.data = res.data;
      this.loading = false;
    }, err => {
      this.loading = false;
      console.log(err);
    });
  }
Finally, let’s add a bit of code to app.component.html and app.component.scss files, respectively.
// app.component.html
// ...
<div *ngIf="loading || data.length > 0" class="container mat-elevation-z8">
    <div *ngIf="loading" class="loading">
      <mat-spinner *ngIf="loading"></mat-spinner>
    </div>
    <div class="table-container">
      <table mat-table [dataSource]="data" class="table">
          <ng-container *ngFor="let column of header; let i = index;" [matColumnDef]="column">
            <th mat-header-cell *matHeaderCellDef>
                {{column}}
            </th>
            <td mat-cell *matCellDef="let row">
                {{row[i]}}
            </td>
          </ng-container>
        <tr mat-header-row *matHeaderRowDef="header; sticky: true;"></tr>
        <tr mat-row *matRowDef="let row; columns: header;"></tr>
      </table>
    </div>
</div>
// app.component.scss
.container {
padding-top: 20px;
position: relative;
}
.table-container {
position: relative;
justify-content: center;
min-height: 200px;
max-height: 50vh;
overflow: auto;
}
table {
width: 100%;
}
.loading {
position: absolute;
top: 0;
left: 0;
bottom: 56px;
right: 0;
background: rgba(0, 0, 0, 0.15);
z-index: 1;
display: flex;
align-items: center;
justify-content: center;
}
/* Column Widths */
.mat-column-number,
.mat-column-state,
.mat-header-cell {
max-width: 124px;
min-width: 124px;
}
.mat-column-created {
max-width: 124px;
}Recompile the Angular app (just in case, if you are having any issues), using,
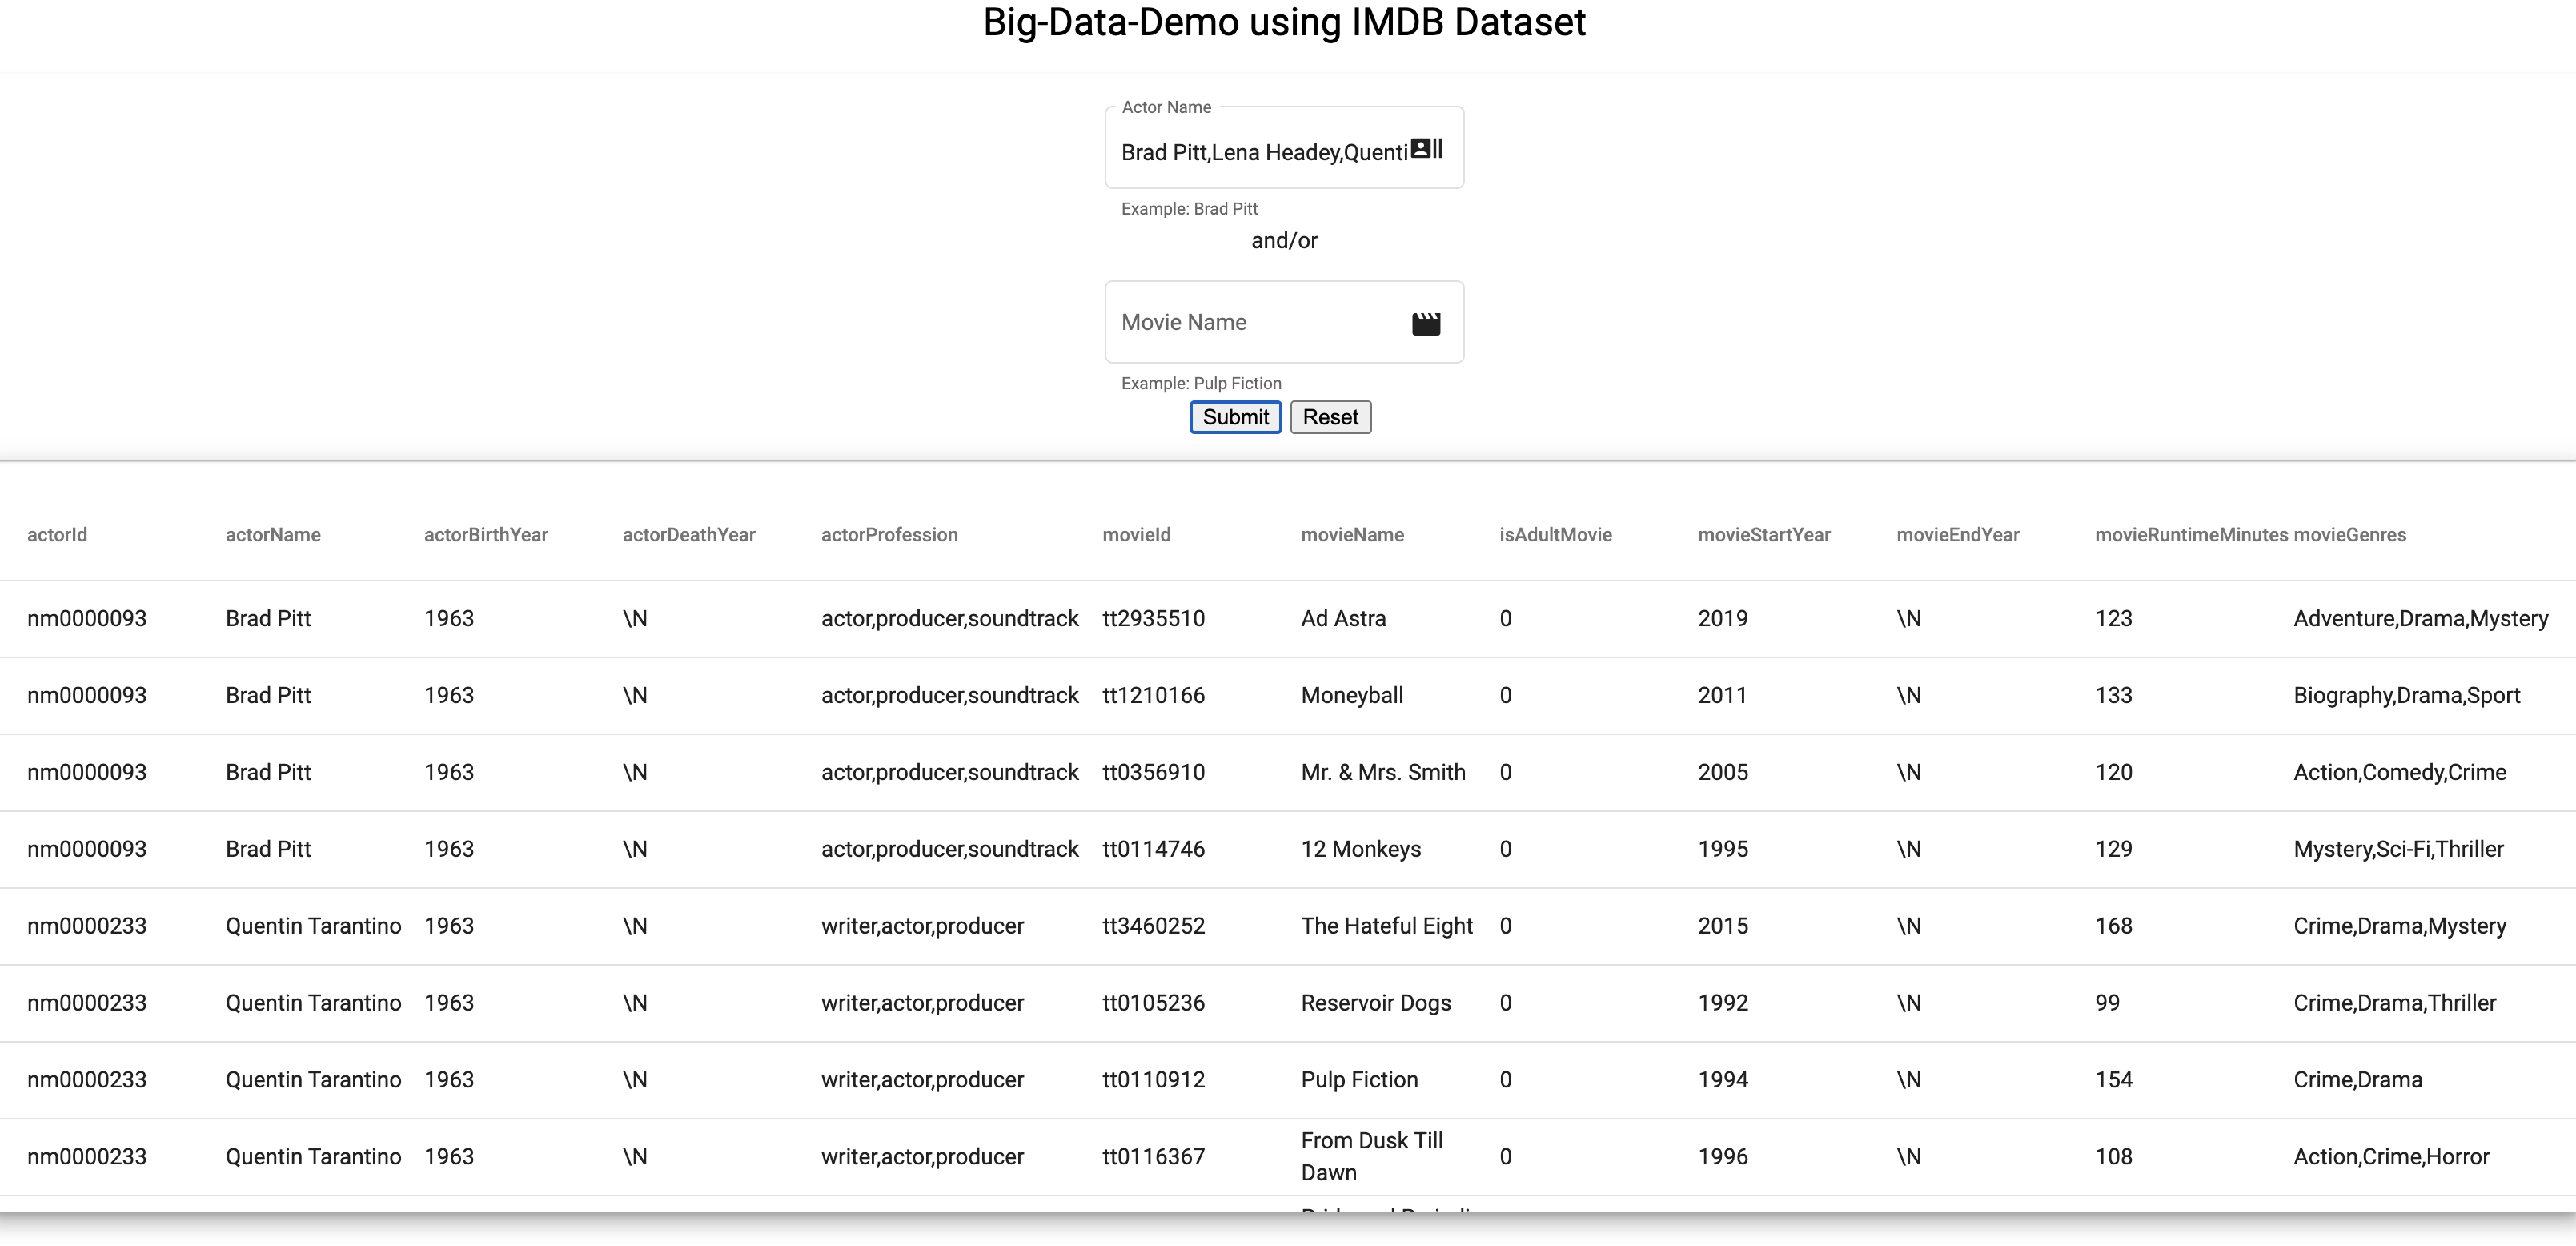
ng serve --watch --port 4200 --host 0.0.0.0Just like that, we have a fully working web-application that serves the movies for the actors provided in the web-form.
Happy Coding! ![]()
![]()